Blog articles
Use blog articles to share news, updates, and announcements with your digital workplace. Blog articles offer a formal writing platform typically used to create and house timely content that stays relevant for more than a day.
Blog articles live on Blog Channels and can be aggregated using a Blog Articles widget.
Sections in this article:
Considerations and caveats
Channel templates
If you are creating articles on a channel that follow a consistent structure, consider setting up channel templates to pre-populate the body of new articles with the recurring elements to save time. For more information, see Channel Templates.
Creating
You can start creating a blog article in a couple of different ways (you require at least write access to a blog channel to be able to add content to it):
- Go to a blog channel and select + Add an article.
- On the userbar, select
 Add Content followed by Blog Article.
 - On a Blog Articles widget configured to show an add link, select + Add an article followed by a channel that you want to post on.
- On an Add Button widget configured to post to a blog channel, select + Add an article.
- Email content to the blog channel. The channel must be configured to allow emailed content. For more information, see Add Content via email.
Except for the email method, the different options above will bring you to the Add Article page, where you can craft your blog post. You can find more information about the various fields and settings in the Options section of this article.
After you have finished crafting your article and configuring its various options, you can select:
- Save as Draft: By saving the article as a draft, you can return to editing it later or add additional authors. For more information, see Drafts and Ghostwriting content.
- Publish / Send to Moderator: Add the article to the selected channel. If the channel has moderation enabled, the article will only get posted after being approved by a moderator. For more information, see Moderation.
Article layout
Blog articles consist of the following components from the top of the page to the bottom:
- Title section: Displays the title of the article and breadcrumb navigational links.
- Space navigation: If the blog is part of a space, it displays links to locations at the root of the space.
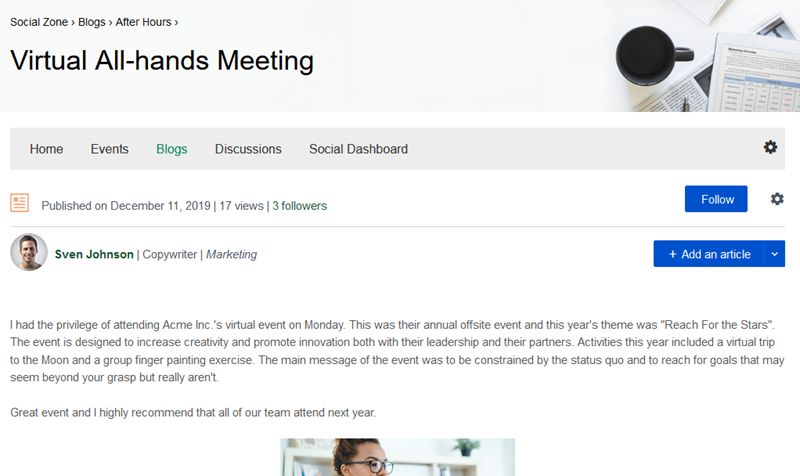
- Blog header: Contains the following information and tools:
- When the article was published.
- The number of views on the article.
- The number of followers. Administrators and users with at least Edit access to the article can select the number of followers to view who is following.
- A Follow button that users can select to receive (or stop receiving) instant notifications about comments and edits to the article.
- The article's Actions button. Only visible to administrators and users who have at least Edit access.
- The author of the article, their occupation, and department. Users can select the author's name to go to their profile.
- The + Add an article button that users can select to create a new article. Only visible to administrators and users who have at least Write access.
- Content section: Contains the following:
- The body of the article.
- A Like button.
- A Copy link button that copies the URL of the article so that it can be pasted elsewhere.
- Comments and Related Content tabs: Users can alternate between these tabs to view and interact with their content.
- Tasks: If enabled, users can create tasks on the article.
- Trailer bar: Contains the following:
- A Follow button that allows the selection of notification frequency.
- An Email Link button that creates an email containing a link to the article.
- A Broadcast button (for users in groups with the role), that allows users to send a notification to specific groups.
Options
Standard
Title
Enter a name for the article. This name will appear above the article and will also be used to generate a unique URL. This field is required.
Channel
Select which channel you want to publish to. When you start the content creation process from a widget or channel, the Channel field defaults to the channel you selected or were on. In contrast, creating content using the add button on the userbar results in the Channel field being blank. In all cases, you have the option to select a different channel. This field is required.
To select a channel:
- Select the Channel drop-down.
- Search for a Channel by its name or the name of its parent Page or Space. This search will return up to 100 results. You will only see Channels to which you have at least Write access and their parent Page or Space (regardless of Access Level).
- Select a Channel from the list by clicking on it.
Summary
Enter an overview of the article. This will be displayed in plain text above the main body of the blog post. It can also be displayed in Blog Articles widgets. Summaries have a maximum size of 2048 characters.
Body
Enter the body of your article. For more information about the available tools, see WYSIWYG Editor.
Attachments
Drag files from your computer into the attachments field, or select Select files from your computer to browse your computer. Attachments will appear directly below the body of your published article and will be available for download. For more information, see Attachments.
Labels
Select what labels to apply to your article. You may be required to select a label depending on how the channel is configured.
To add a label, select the label drop-down and search for the label that you want to add. Once you have found it, select it to apply it to your article.
For more information, see Labels.
Advanced
Related Content
Search for content to add as related. For more information, see Related Content.
Broadcasting
Select what groups to broadcast the article to. Which groups you can select, if any, is determined by roles. For more information, see Broadcasting and Roles.
Commenting
Toggle whether users can post comments on the article. For more information, see Comments.
Notification settings
Toggle whether the body of your article is included in subscription notifications. When this option is selected, notifications will only include the article's title, summary, and a link to the content. New content will inherit this setting from the channel. However, you may override this channel setting when drafting your content. For more information, see Disabling blog body content in email notifications.
Future publishing
Schedule your article to be published at a future time. For more information, see Scheduled content.
Pinning
Only available for published articles. Toggle whether the article appears at top of a blog channel's feed, and for how long it stays there. For more information, see Pinned Content.
Archiving
Select an archiving policy for your article. For more information, see Archiving.
Read tracking
Select whether your article has read tracking enabled and customize the text of this button. For more information, see Read Tracking.
Languages & Translations
Current language
Select to change which language version of the article you are looking at. For more information, see Languages and Translation.
Translate
Select a language to Translate from and a language to Translate to, and then select Translate. The title, summary, and body of the initial language will be translated into the selected language. The language you are currently viewing will change to the one that you translated to.
Translated fields will have a verify checkbox appear under them. Check this box after having read the translated content and verified its accuracy. This can be used as a method of auditing whether the translated text was reviewed.