Read Tracking
What is it?
Read Tracking allows you to track whether or not a digital workplace member has engaged with a piece of content. Read Tracking can be made available in Blogs, Calendars, Forums, Folders, and Wikis.
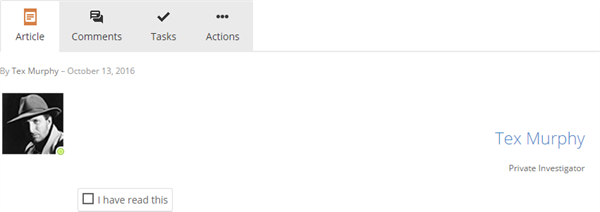
When you enable Read Tracking, a default button that says, I have read this, will be placed at the end of a piece of content. However, the text may be changed to a custom message, if you prefer. People reading content can click the button to acknowledge and confirm they have read it. The button requires two clicks to confirm, which helps prevent mistaken clicks from being counted.
Use Cases
Corporate policy compliance
Read Tracking is most commonly used on corporate policies that all employees need to read and agree to. Including a Read Tracking button makes it easy for people to indicate that they have read the policy. It also provides a report, listing who has and has not read the material.
Onboarding
Read tracking provides an easy way to monitor who has completed onboarding tasks, like reading safety manuals and setting up their workplace Profile. Creating an article that describes each task and includes a Read Tracking button on each makes it easy for Human Resources managers to keep track of people’s progress through the onboarding process.
Gauging interest
Since the Read Tracking button can include any text, it is possible to have people use it to indicate their support for a suggestion or idea on a forum.
Simple sign-up form
If you have an event or promotion, you can use Read Tracking as a one-click sign-up option. Anyone who wishes to attend or be included can click the button, which will automatically add them to the Read Tracking report. This provides an easy way for the managers of those events to get a list of names of interested people.
Features and functionality
Our platform is simple and intuitive but that doesn’t mean its capabilities are limited. There are a number of ways you can configure our platform to do exactly what you want. Below is a list of all additional features found within this particular feature or function.
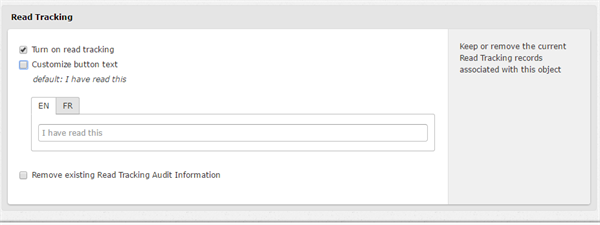
Read Tracking options are available in the Edit options for a piece of content. Here you can turn on tracking on specific content in your workplace, and can also customize the message that is displayed, or choose the default content which says, I have read this. Finally, selecting the option Remove Existing Read Tracking Audit Information will clear the tracking information when the changes are saved.
Read Tracking audit information
If Read Tracking has been enabled, anyone with Edit access can view a list of people who have clicked on the Read Tracking button on a piece of content. You can view this content by selecting the Read Tracking option from the Action Button menu.

The Read Tracking audit screen provides the following features:
Filter by name - Allows you to search the list for a specific workplace member.
Toggle read/unread - You can toggle the list to display only those people who have indicated they read the document, or those who have been assigned to read the document but have not yet done so.
Export - Selecting Export will download a CSV file to your computer. This file contains a list of all people who have been assigned to read the document and all that have pressed the Read Tracking button. The file includes their name, and the date they pressed the button. Reports exported by Site Administrators also contain member email addresses.
Remind - Selecting Remind next to a person’s name will send an email to that person reminding them to read the content and providing a link to it.
Remind all - Selecting Remind All will send an email with a link, to all people assigned to read the content who have not yet read it.
Assign groups - This option allows you to select groups to be added to the audit list. Groups can be removed by selecting the “x” next to the group name. This allows you to send reminders and track who has not yet engaged with the material.
How to enable Read Tracking
Follow the steps below to enable Read Tracking on a piece of content.
Step 1: Navigate to the content
Navigate to the content you wish to enable read tracking on.
Step 2: Select the Action Button
On the article toolbar select the Action Button.

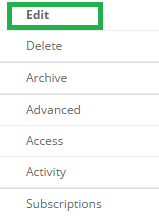
Step 3: Select, Edit
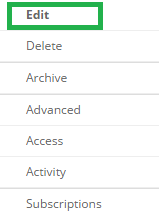
Once you select the Action Button, a menu will appear. Select, Edit from the list of options.
Step 4: Select, Edit
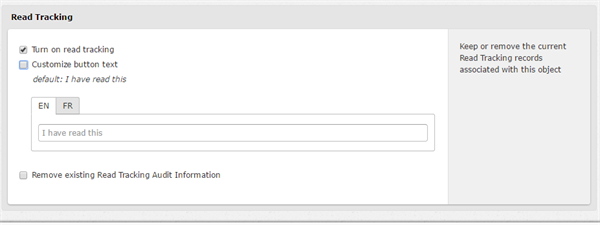
Once you select Turn on Read Tracking, a checkmark in the box indicates that read tracking is turned on. If you would like to create custom text to appear in the Read Tracking button, you can enter it here.
Step 5: Select, Save
Select the Save button at the bottom of the screen.

How to clear Read Tracking data
Follow the steps below to clear Read Tracking on a piece of content.
Step 1: Navigate to the content
Navigate to the content you wish to clear the Read Tracking audit information on.
Step 2: Select the Action Button
On the article toolbar select the Action Button.

Step 3: Select, Edit
After you select the Action Button, a menu will appear. Select, Edit from the list of options.
Step 4: Remove the existing read tracking information
Select the option Remove Existing Read Tracking Audit Information.
Note: If read tracking data is not recoverable after it has been removed. Be sure to export and save the old data before clearing it.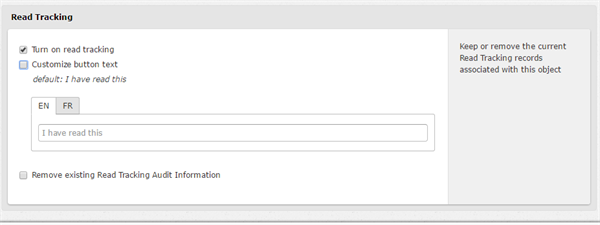
Step 5: Select, Save
Select the Save button at the bottom of the screen.

Frequently Asked Questions
What level of access do I need to see Read Tracking information?
Anyone with Edit access or above can see the Read Tracking information on a document or article.
Can I have Read Tracking turned on by default?
Yes, under the Settings area for any channel you can enable a default Read Tracking state for new content created there.