Site Manager
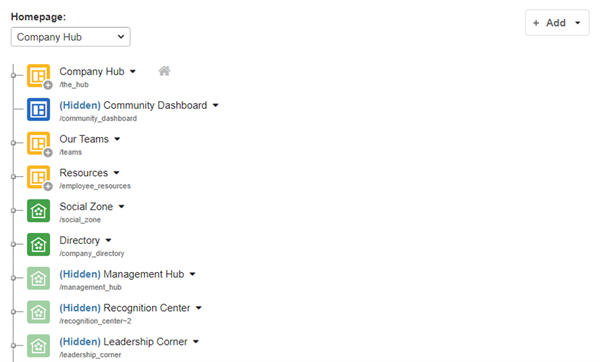
The Site Manager displays an interactive map of the digital workplace. Workplace Administrators can access the Site Manager from the Control Panel to Add, Move, Remove, and Edit the Channels, Pages, Spaces, and Dashboards that are part of the workplace. Changes made on the Site Manager happen immediately.
The Navigation page of a Space provides Space Administrators with similar functionality.

Navigate the Sitemap
Click the plus button located to the left of a Page or Space to display the locations under it. Clicking this button again will hide the items located under the location. If a Page or Space does not have anything under it, this button is not displayed.
Change the Homepage
The house icon next to an item in the Site Manager indicates that it is the current Homepage of the digital workplace. Users who navigate to the root URL of your digital workplace are brought to this location.
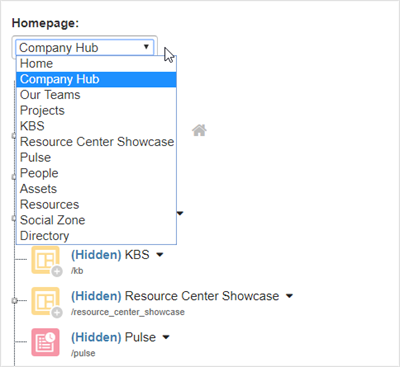
Change the Homepage by clicking the Homepage dropdown at the top of the Site Manager and then selecting an option from the list.
Add Channels, Pages, and Spaces
Click the Add button to view a list of items that can be added to the workplace. Options include:
- Blog Channels
- Calendar Channels
- Folder Channels
- Forum Channels
- Microblog Channels
- Task Channels
- Wiki Channels
- Pages
- Spaces
- Dashboards
Move Channels, Pages, Spaces, and Dashboards
Click and drag the Channel, Page, Space, or Dashboard to where you want it to be. As you drag the item over other items in the site manager a horizontal bar will indicate where the moved item will be placed when you release the mouse button. Holding the item over a Page or Space will expand its contents (if they are not already expanded).
When you release the mouse button you may receive a popup warning that the URL path of the object will change. This message occurs when you move an item between Pages or Spaces, from the root of the workplace to a Page or Space, or from a Page or Space to the root of the workplace. Any links that provide navigation to the item's old location are redirected to the new location.
While specific access rules on the object will persist when you move an object, inherited access rules will change based on what is cascading from the parent object. Before moving an object:
- Check the object's current access rules to understand what inherited access rules will be lost.
- Check what access rules the object will inherit at its new location to understand what inherited access rules will be gained.
After moving an object in the site manager, you should always check its access rules to ensure that only the intended users have access to it.
Edit Channels, Pages, Spaces, and Dashboards
Click the action button located (downward facing arrow) to the right of a Channel, Page, Space, or Dashboard to view what actions you can perform. These options will vary depending on the item but may include:
- Quick Edit: Enter a new Title and URL.
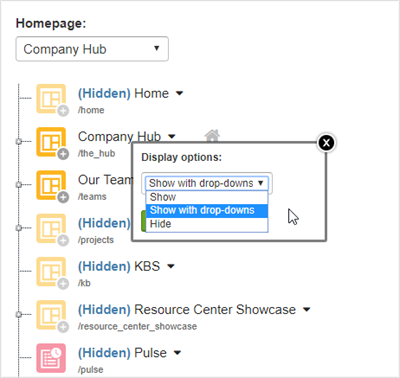
- Navigation: Select whether the item displays in the navigation, or is hidden. A hidden item can still be accessed and will still appear in search results. For Pages and Spaces, you can also select whether it has a drop-down that displays links to the items located under it. This drop-down only appears when the item is in the main navigation bar.
- Full Edit: Navigate to the item's Edit page.
- View: Navigates to the item.
- Access: Navigate to the item's Access page.
- Settings: Navigate to the item's Settings page.
- Delete: Delete the item and all of its contents from your workplace. Deleting a Page or Space also deletes anything underneath it. Deleted items will exist in the Trash Can for 30 days.
How to use the Site Manager
The Site Manager is the tool used to create the structure of your workplace. It's where pages, spaces, dashboards, and channels for content are created. To access the Site Manager and start building your workplace, check out the instructions that follow.
Step 1: Access the Site Manager
Select Site Manager under Presentation inside the Control Panel.

Step 2: Create channels (Blog, Calendar, Folder, Forums Microblog, Wiki, and Task), pages, spaces, dashboards.
Press the Add + button in the upper right-hand corner of the Site Manager, and choose the type of channel, page, space, or dashboard you would like to create. The Site Manager provides a hierarchical overview of your digital workplace so you can set the navigation paths as you build your workplace simultaneously.

Step 3: Remove content (if applicable)
Select the black downward facing arrow icon to the right of the channel, dashboard, page, or space you wish to remove and select Delete
.png?width=400)
Step 4: Hide content from primary navigation (if applicable)
You may want to hide what you are working on until it is done and ready to be shared. To hide your work, select the back downward-facing arrow icon to the right of the channel, page, dashboard, or space and then, select Navigation. Place a checkmark next to Hide from navigation.

Step 5: Configure the homepage
The homepage dropdown determines what users will visit when they navigate to the workplace URL. It can be set to any page at the root level of the workplace.
