Adding files to folder channels
Add files to your digital workplace to make them easily accessible to other users of your digital workplace. These files can be easily linked to, embedded in other digital workplace content, surfaced using widgets, and previewed without the need to download. Files also support version control, allowing users to upload new versions of a file and view past versions.
You can upload any file type to your digital workplace, however, some file types cannot be previewed.
Sections in this article:
- Considerations and caveats
- Who can do this
- How to get to the file upload page
- Uploading files
- Pending uploads
- Access
- File properties
Considerations and caveats
- File size limit: You can only add files that are less than 2GB.
- Upload limit: You can add up to 50 files at once using the file upload page.
- Search indexing: For information on how files are indexed by search, see Search.
- Content Creation via Email: For information about emailing files to a folder channel (but not subfolders), see Adding content via email.
- File preview: For more information regarding what file types can be previewed, see File Preview.
- Versioning: For more information on how to version an existing file, see Version control.
- Moderation: If adding files to a moderated folder channel, a moderator will need to approve the publishing of the file before it is available to others. For more information, see Moderation.
- Folder Contents widget: For more information on how to display folders on pages, see Folder Contents widget.
- File Manager: For more information about using the File Manager application to manage files in your digital workplace, see File Manager.
Who can do this
You must have at least Write access to a folder or folder channel to add content to it.
How to get to the file upload page
The file upload page for a folder/folder channel is where you go to add files to your digital workplace. You can get to a folder's file upload page in the following ways:
- Userbar
- On the Userbar, select
 Add Content.
 - From the Add Content menu, Select
 Upload File(s).
 - On the Select Folder page, find the folder you want to add your files to and select it.
- On the Userbar, select
- Folder / Folder Channel
- Go to the folder that you want to add files to.
- Above the listing of files and folders, select
 Add File.
- Folder Contents widget (if enabled)
- Select + Upload a file found below the contents of the widget.
- Add Button widget (if connected to a folder channel)
- Select + Upload a file.
Uploading files
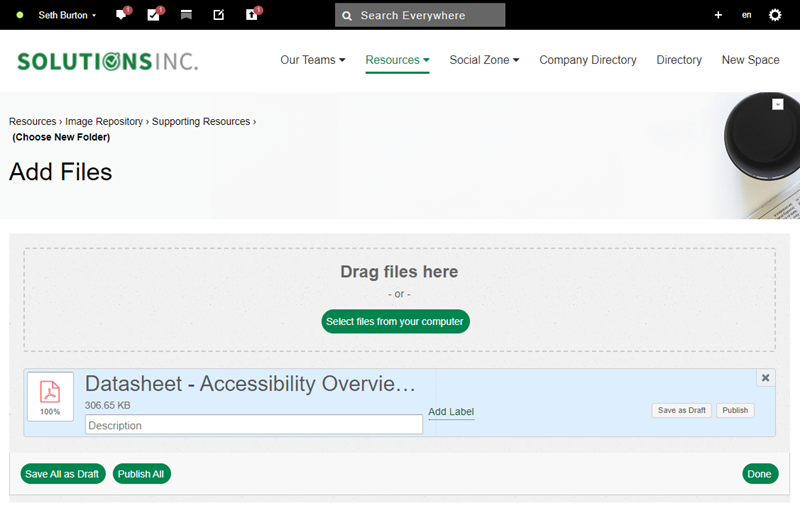
Once you are on the file upload page, you can add files by:
- Dragging and dropping them from your device into the marked area.
- Select Select files from your computer to select files using your device's file explorer.
After you add files to the upload page, they will require some time to be uploaded. The amount of time this takes depends on the size of the file. Each file you upload will have a progress bar indicating how much of the file has been uploaded.
When uploading a file, you can do the following:
- Change the file name: Select the name of a file to enter a new name for it. When renaming the file, do not remove the file extension.
- Add a description: Enter additional information about the file that may be helpful to others. This description gets displayed in the information panel of the file preview page.
- Add a label: Select to add labels to a file.
- Save as Draft: Select to save the associated file as a draft. You can find saved drafts by going to the Manage page of a folder channel.
- Publish: Select to publish the associated file to the folder. If the folder channel is moderated, approval from a moderator will be required before the file is published.
- Save All as Draft: Select to save all uploaded files as drafts. You can find saved drafts by going to the Manage page of a folder channel.
- Publish All: Select to publish all uploaded files to the folder. If the folder channel is moderated, approval from a moderator will be required before the files are published.
- Cancel: Select
 to remove the file upload.
 - Done: Select to leave the file upload page.
Not all file properties are available to edit on the file upload page. However, you can modify all properties before publishing by saving a file as a draft and then editing the draft.
Pending uploads
If you close the file upload page without saving or publishing files, a  Pending Uploads notification will appear on your Userbar. You can select this notification to view links to and the status of any of your unpublished and unsaved files. To action, select files from this list to return to the file upload page.

Access
By default, newly uploaded files inherit the access rules of their parent folder.
File properties
| Property | Description |
|---|---|
| Title | Enter a name for the file. |
| Description | Enter additional information that helps other users determine the use and purpose of the file. |
| Related Content | Add links to other content in your digital workplace. Select the search option to find the article you want to link to. After finding and selecting content, you can select whether to Show link on both items. If unselected, the link will only appear on the file you are editing. To remove related content, select  Remove. Remove.Related content links appear in the content's information panel. For more information, see Related Content. Not available on the file upload page. |
| Labels | Add labels to provide additional ways for users to find the file using search. Select Add Label to view the available digital workplace labels. From this list, select the labels that you want to add to the file. To remove labels, unselect them. For more information, see Labels. |
| Comments | Select whether users can comment on the file. Users can post comments when Allow members to post comments is selected. The folder channel's Comments property determines the default state of this field for new content. Not available on the file upload page. |
| Archiving | Select the archiving policy that governs this file. Options include:
|
| Read Tracking | Select whether the file displays a read tracking button that users can select to acknowledge that they have viewed the file. Not available on the file upload page. |