Published
on
December 25, 2020
| 3,971 views
| 1 follower
members are following updates on this item.
If you count yourselves among the many organizations who have built web-based tools for employees to use, then you most likely know what a challenge it is to drive traffic to your tools. Many of our customers create links to those tools from within their Igloo site, but what if there was a way to surface your custom built application or content directly?
Well, There is!
There are many cases that warrant a deep integration - but for those cases where simply presenting the application to a user is sufficient, you can easily create an integration widget to iFrame that content into the site.
The HTML Widget can certainly accomplish this task, and many users have done it in this way. The HTML Content Widget provides a means to include information and images on a Page or Space. It can also be used to embed third-party widgets, and as a target for custom content generated through JavaScript.
Our HTML widget is extremely capable - but what if you need to be able to provide that content to non-developers? Creating an iFrame Integrations Widget will allow your content owners to deploy your web-app anywhere in the site, without needing to write any code- you'll have done that all for them.
Building an integrations widget is not difficult- but you do need to have some knowledge of HTML, CSS and Javascript. The widget itself runs in a 'sandboxed' environment- it's in itself an iFrame that has access to Igloo API data. More information - and a zip file containing a "Hello World" getting started example can be found in our Developer Knowledge Base.
For our iFrame Integrations Widget, we'll use the widget configuration object, and write some very simple HTML, CSS and Javascript to load your url into an iFrame within the widget.
Let's have a look at the content of the integration.json file:
{
    "version": "1.0.1",
    "id": "iframeportalwidget",
    "name": "iframeportalwidget",
    "description": "iFrame Potal Widget",
    "vendorName": "@igloosoftware",
    "categories": [],
    "published": "",
    "userConfig": [
        {
            "name": "portal_url",
            "label": "Url",
            "type": "text",
            "default": " ",
            "description": "Enter your iframe url"
        }
    ]
}
This is where we define what parameters we'll be presenting when content creators/administrators deploy the widget. In this particular case, we're only going to use one parameter - the portal_url - this is the url of the web app you're going to embed into your site. You can even set a 'default' value.
For more information, we have a Knowledge Base article that goes into greater detail.
The workhorse of the Integrations Widget is the content.html file:
<html>
<head>
    <meta name="viewport" content="initial-scale=1.0, user-scalable=no" charset="utf-8">
    <script src='https://cdnjs.cloudflare.com/ajax/libs/iframe-resizer/4.0.4/iframeResizer.contentWindow.js'></script>
</head>
<style>
    html,
    body {
        width: 100%;
        height: 600px;
        margin: 0;
        padding: 0;
    }
    .scroll-wrapper {
        -webkit-overflow-scrolling: touch !important;
        overflow-y: scroll;
        overflow: scroll !important;
        width: 100%;
        height: 100%;
    }
    .scroll-wrapper iframe {
        border: none;
        width: 100%;
        height: 100%;
    }
</style>
<body>
    <!-- This is the iFrame we're going to populate -->
    <div class="scroll-wrapper"><iframe id="portal-iframe" scrolling=auto></iframe></div>
    <script>
        // We can access configuration items from within the widget. These are defined in the widget's integration configuration panel. This function will populate all of the configuration items and return it, for easy configuration access.
        function createConfiguration() {
            if (window.frameElement.getWidgetConfig) {
                let config = window.frameElement.getWidgetConfig();
                window.widgetConfig = {};
                if (config) {
                    for (key in config) {
                        window.widgetConfig[key] = config[key].toString();
                    }
                }
                return window.widgetConfig;
            }
        }
        // Get the config...
        let config = createConfiguration();
        // and set our iFrame body with the correct source
        document.getElementById("portal-iframe").src = config.portal_url;
    </script>
</body>
</html>
As you can see, it's a very small, straightforward webpage that does nothing more than create an iFrame inside a DIV. On line 4, I've included an iframe-resizer script that in certain circumstances help with automatically resizing the widget. Additionally, on line 10, you'll see we've set the height to 600px. On line 29, we have the iFrame that we'll be populating.
Immediately following that, on line 30, is the <script> that builds the JavaScript object array that is accessible by the window.
And last but not least, on line 47, we set the iFrame's src parameter to the value you've set via the configuration parameter.
Upon registering for the developer program, you'll be provided with the credentials you need to build on our platform. Add your credentials to the credentials.json file:
{
"account": "PUT YOUR ACCOUNT HERE",
"key" : "API KEY HERE",
"url": "INTEGRATION URL HERE",
"environment": "Sandbox",
"provider": "azure"
}
With your credentials file populated, and your code completed, you can now deploy the widget. This is as simple as running node ./deploy.js in your console.
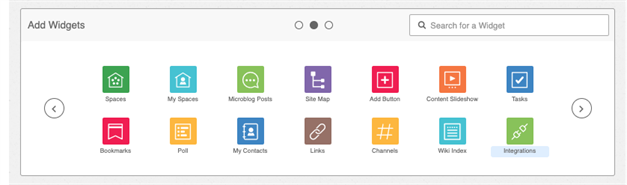
Once the widget is deployed, you (and your administrators) can use the widget on any space or page in the site by dragging the Integrations Widget from the 'Add Widgets' section of the page edit screen on to your page.
Editing the widget, you will need to select the appropriate repository - in this case it's been pushed to the "Developer Relations Development Repo" - so we'll use that one and then select our new widget from the list.
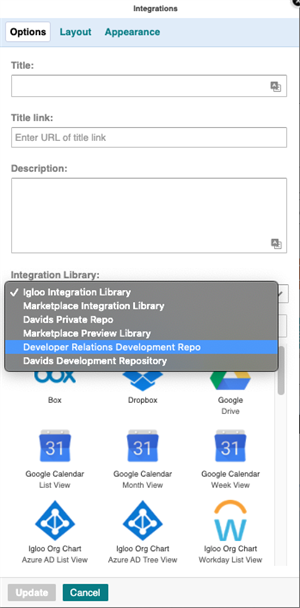
Now we can edit the widget and set any values we need in the config - in this case, it will be the url to the web app you're going to iframe into your Igloo site.
And that's it!