Inserting an image into the WYSIWYG Editor
Inserting an image into the WYSIWYG Editor
Use the WYSIWYG Editor to insert images (PNG, JPEG, GIF) into your content. You can add images directly to content or reference them from another location (such as a Folder Channel).

Considerations and caveats
Uploading an image vs. Referencing a URL
Uploading an image or dragging and dropping an image into the editor stores that image as part of that content in your digital workplace. In contrast, referencing an image URL results in the image appearing in the article, but it is still being stored elsewhere (the URL location). This distinction is important for the following reasons:
- Image file sizes must be below 10MB when uploading an image into your content. This restriction does not apply when referencing an image by a URL.
- Uploading an image into content creates a unique URL for the image in your digital workplace. Deleting the content that contains this image also deletes the image. References to this image URL elsewhere in your digital workplace will now appear broken as the source image is gone.
- If referencing a URL, make sure that your users have access to view the image. For images on external repositories, this means that the image should be public, or shared to the necessary users using the image provider's sharing options. For images in a Folder Channel of your digital workplace, the Access Rules on the image determines who can view it.
Image sizing
Large images automatically resize to 300px in width when first inserted into the editor. The image will insert immediately.
Images in content
Enlarge images published in Blog Articles, Calendar Events, Forum Topics, Microblog Posts, Tasks, and Wiki Articles by clicking on them. You can then navigate through all the images in that piece of content using the provided arrows and gallery (these only appear when multiple images are present in the content).
How to insert an image into the WYSIWYG Editor
Dragging and dropping
While you are creating content in the WYSIWYG Editor, drag an image from your computer into the editor.
Uploading an image
While you are creating content in the WYSIWYG Editor:
- Click a location in the editor where you want to insert the image. If you select a location in the middle of a paragraph, the image will insert on a new line after the cursor's location.
- Click Insert Image (
 ), and then Upload Image (
 ).
). - Click Drop image to select an image file from your computer. If you have the image location already open, you can drag it into this box instead. The image will insert immediately.
Referencing a URL
While you are creating content in the WYSIWYG Editor:
- Open a separate browser tab and go to the image.
- Right-click the image and select "Copy image address".
- If the image lives in a Folder Channel of your digital workplace, copy the link associated with the Download button. The copied URL will contain a reference that specifies the current file version of the image. If you want the image to always show the latest version you must remove the version value from the URL. This part of the URL takes the form of ;v#where # is the number of the current version.
https://{your digital workplace}/download/files/otisjpg;v1?data=larger
- If the image lives in a Folder Channel of your digital workplace, copy the link associated with the Download button. The copied URL will contain a reference that specifies the current file version of the image. If you want the image to always show the latest version you must remove the version value from the URL. This part of the URL takes the form of ;v#where # is the number of the current version.
- Back in the WYSIWYG Editor, click a location in the editor where you want to insert the image. If you select a location in the middle of a paragraph, the image will insert on a new line after the cursor's location.
- Click Insert Image (
 ), and then By URL (
 ).
). - Paste the URL you copied in step 2 into the text box.
- Click insert to add an image from this location.
How to edit images in the WYSIWYG Editor
Image editing tools
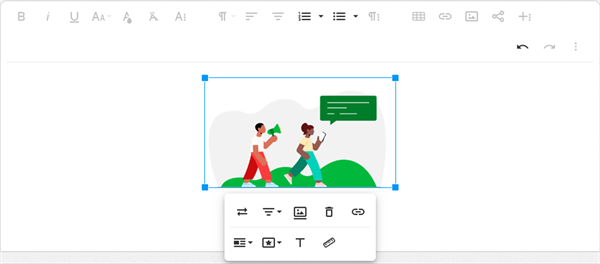
Selecting an image while editing content in the WYSIWYG Editor displays a toolbar with the following editing tools:
| Action | Usage |
|---|---|
 Replace Replace | Replace the current image with a new one. Similar to inserting an image, you can Upload Image or reference By URL. |
 Align Align | Position the image horizontally. Setting the Display option to Inline causes paragraph alignment settings to impact the position of the image. |
 Image Caption Image Caption | Add a caption below the image. You can style this text. Clicking a second time will remove the caption. |
 Remove Remove | Remove the image from your content. |
 Insert Link Insert Link | Make the image a clickable link that navigates to a URL. |
 Display Display | Set how the image interacts with the other objects in the editor. Selecting Inline allows the placing of text or other images next to this image while selecting Break Text will make the image take up the entire line. |
 Style Style | Give the image Rounded corners, a Bordered effect, or a Shadow. |
 Alternative Text Alternative Text | Enter alternate text for the image; the default will be the file name. To improve accessibility, enter a concise description of the image. This alternative text is used by screen readers to describe the image. |
 Change Size Change Size | Set the width and height of the image. |
 Crop and Rotate Crop and Rotate | Crop, rotate, and adjust the zoom level of an image. This option is only available for images you have dragged and dropped into the editor or uploaded into the editor. See, Editing an image below to learn more about how to use these tools. |
Moving an image within content
While editing content, move an image to a new spot by dragging and dropping it. The image will insert at the spot indicated by the cursor inside the editor.
Resizing an image
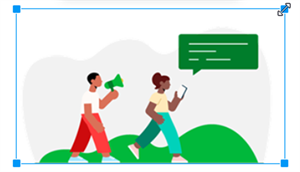
In addition to resizing with the Change Size tool ( ), you can drag the handles of a selected image to increase or decrease its size.

Editing an image
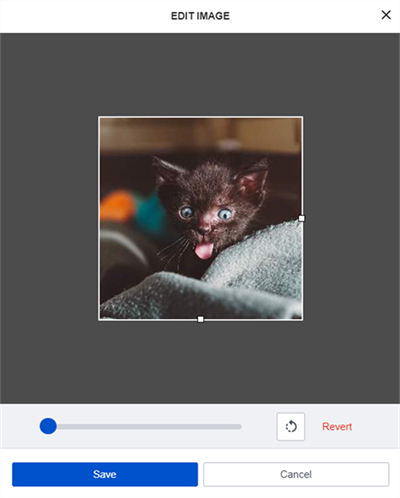
Click the Crop and Rotate tool ( ) to open the Edit Image window. This option is only available for images you have dragged and dropped into the editor or uploaded into the editor.
From this window, you can perform the following actions:
- Crop the image by dragging the vertical or horizontal square handles of the cropping box or dragging the image relative to the cropping box.
- Rotate the image 90 degrees counter-clockwise by clicking Rotate (
.png?width=20) ). This action is repeatable.
). This action is repeatable. - Zoom in on the image using the slider bar.
When you are ready to apply your changes, click Save. The resulting image that appears in the WYSIWYG editor will be what was highlighted within the cropping box. If you instead want to discard your changes, click Cancel.
Until you save the contents of the WYSIWYG editor, you can revert any image edits you've made since the last time you saved the contents of the WYSIWYG editor. To revert your changes, click the Crop and Rotate tool ( ), and then click the Revert button. The WYSIWYG editor contents are saved whenever you publish the content, save a draft of the content, or click to update an HTML Widget.
Adding a line break above or below an image
Hover over the top or bottom of an image to reveal a break button. Click this button to add a line break. This option is only available when there is not already a line above or below the image.

