Customizing your Footer
What is it?
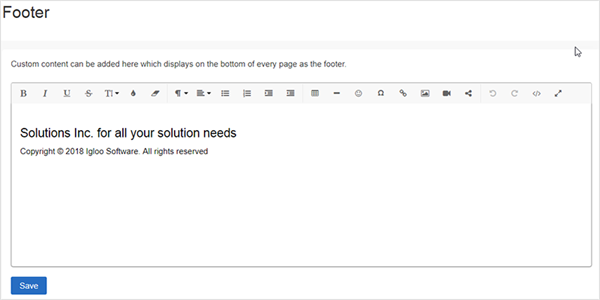
The footer is a customizable line or block of text the lives at the bottom of each page in your digital workplace.

Use Cases
A site administrator can add links and other useful information to a footer. This information will remain constant throughout your workplace.
Social media
Using the social media icons and/or links within your footer makes it simple to access your company social media pages directly from your workplace.
Quick links
Keeping frequently used quick links in your workplace footer helps create a consistent user experience. Members of the workplace will know items they need on a regular basis will be accessible from the footer.
Remember that you can customize an additional footer within a space. Spaces have their own footer options as they are somewhat like a mini-workplace. These links could be space-specific if it is a department with commonly used resources external to the workplace.
Features and functionality
You can add custom text and links to your footer that will allow users to navigate to other parts of the workplace or to entirely different sites such as your company’s website. If you’ve written custom JavaScript that you need to execute everywhere in your workplace, the best place to load the script is inside the footer. Custom JavaScript can be uploaded to your workplace using the Folder Channel, and then called by using the WYSIWYG editor to modify the HTML source of the footer.
How to customize your footer
There are two places where a footer exists, one of them being the bottom of the site and the other is in a space. There are two places where a footer can exist: at the bottom of the site or in a space. The overall site footer can be seen throughout the entire workplace. The space footer works exactly the same way as the site footer, except it is specific to a space. To get to the space footer, select the Control Panel on the navigation bar, and under Presentation, select Layout (Check out the article Presentation - Control Panel for more detail). Next, scroll to the bottom of the layout page to find the editor for the space footer. The space footer will sit above the workplace footer.
Step 1: Select the Control Panel
The Control Panel has a gear-like shape and is located on the right-hand side of the userbar.
Step 2: Navigate to footer options
Once you select the Control Panel, navigate to the footer under the Presentation tab. This will take you to a new page to customize the footer.

Step 3: Select footer options
Go to the Footer options to add links and other useful text to customize the look of your workplace, using the WYSIWYG editor. You can also add custom JavaScript within the footer to add extra functionality to your site.

Step 4: Save your changes
Once you have customized the footer, select the Save button.
Best practices / Tips & tricks
If your workplace has been customized by Igloo, there will be custom JavaScript in the footer. Always check the source code tab to make sure there isn’t a custom script before deleting everything in the editor.