Last Updated:
June 8, 2022
by
Jesse Langstaff
| Version: 70
| 3,932 views
| 0 followers
members are following updates on this item.
The ServiceNow integration provides you with the ability to view and create ServiceNow Incident tickets. Ticket views can be personalized based on filters, and will only display Incident tickets that a user has ServiceNow permissions to view. Users can click on the information in the Ticket, Caller, and Assignment Group columns (if displayed) to navigate to the associated page within ServiceNow to view additional details. With the provided search, sort (by clicking column names), and page browsing functionality, users can easily navigate their ticket view. Use this widget to help build a centralized location of information for your organization's teams.
The ServiceNow integration only displays and allows users to create Incident tickets.
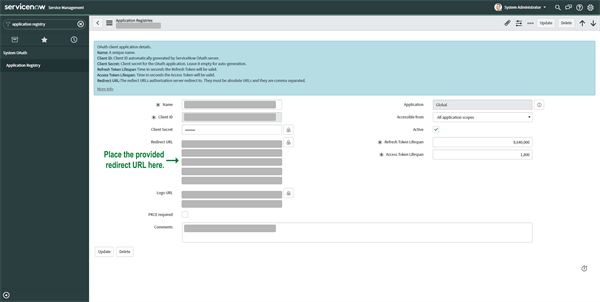
Before setting up the widget for the first time, you must perform the actions listed below. If you have previously gone through this process while setting up another ServiceNow widget to the same ServiceNow Instance, you do not need to do so again and can reuse the Application ID you already have (You will need a different application ID if you want to use the integration in your preview environment). Once you have completed these steps, you can use the provided Application ID across multiple ServiceNow or Unified Search widgets. If you want to connect a widget to a different ServiceNow Instance, you will need to repeat this process for that instance.
After placing the Integration widget on a page or space, it must be configured by clicking the widget's Edit button. Then from the Igloo Integration Library located on the Options tab, select or search for the ServiceNow widget and click it to begin configuring it. The following configuration options control the functionality and appearance of the widget.
Note: The Layout and Appearance tabs are not used in the basic configuration of this widget. If you are applying any enhancements to the widget, you should use the Class field located on the Appearance tab as directed.
Enter the URL of the ServiceNow instance that you want to display in the widget. Only one ServiceNow instance can be configured per widget at a time. This field must contain a valid ServiceNow instance URL or the widget will not function.
Enter the Igloo provided Application ID. You must request this ID if you are setting up this widget for the first time, refer to the "Required actions for your first-time setup" section above. This Application ID is matched to your ServiceNow URL OAuth Application and can be reused in other ServiceNow widgets that connect to the same ServiceNow instance. This field must contain a valid Application ID or the widget will not function.
Select how your users can interact with tickets. You can select View Only, Create Only, or View and Create. If you are providing users with a view of existing tickets, they will only be able to view tickets that their ServiceNow permissions would allow them to.
Enter a ServiceNow query to display a specific scope of tickets. ServiceNow provides a list of query operators that allow you to be more specific regarding what tickets are displayed. This is helpful if you want to limit a widget to only display tickets that are relevant for a specific group or team. By default, all tickets that a user has permission to view will be displayed.
Note: If the widget only allows the creation of tickets, Ticket Filters should not be configured.
Select what ticket information you want to display. Options include: Number, Opened At, Short Description, Caller, Priority, State, Category, Assignment Group, Assigned To, Updated On, and Updated By. In addition to these basic fields, you can enter the names of other columns to display in the provided Additional Columns field. If you are entering multiple values, separate them with a comma.
Note: At least one column must be displayed. If the widget only allows the creation of tickets, Ticket Filters should not be configured.
Users must sign in to the widget in order to access its functionality. After clicking the "Sign in" button, a popup will be presented that requests that you Allow or Deny the connection to ServiceNow; click Allow to continue logging in. If you would like to sign in using a different account, click the "Not You?" located at the top of the popup to manually enter your credentials.