Published
on
January 30, 2019
| 3,415 views
| 34 followers
members are following updates on this item.
Hard coding configuration parameters is never a good idea, and you don’t have to when you’re building a widget. We are going to build a widget that allows us to:
Igloo’s Integration Widget framework allows you to create and pass parameters to the widget when it’s configured on a page. With that being said welcome to Widget Configuration 101!
Every integration project folder contains an integration.json file. This file, if you remember from the Hello World, Again article, is where you would declare the version of your integration, the name, vendor, and description. You can also define configuration options for your widget here!
This is what the default integrations.json file looks like:
{
"version": "0.0.1",
"id": "ig-deploy-hello-world",
"name": "ig-deploy-hello-world",
"description": "This is the Hello World example widget for the Integrations framework",
"vendorName": "@igloosoftware",
"categories": [],
"published": "",
"userConfig": [] --> We care about this right here.
}
There are many different configuration options each with their own data type that you can use in your widget. For the purposes of this article we are going to keep our configuration options short and simple. First, install the default project from the getting started tutorial. Then in this project’s app folder, go to the integration.json file. In this file we are going to add the following object into the userConfig array.
{
"name": "Name",
"label": "Please enter your name",
"type": "text",
"default": "please enter your name ...",
"description": "Name text field that we want to use."
}
Now save the integration.json file and run node deploy.js.
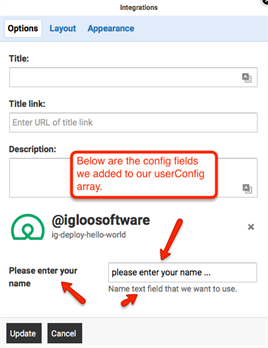
Once the script has completed, we can see what the configuration field looks like the widget. Drop the Integrations Widget onto a page in your digital workplace, edit it, and select the widget from your repository. Your configuration field should appear in the widget.

We can access configuration items from within the widget by creating a widgetConfig object. Before writing some JavaScript, in your content HTML add an h1 tag with Hello World and a div with the id of example. Your content.html should look like this:
<html>
<head>
  <title>My Widget</title>
</head>
<body>
  <h1>Hello World!!</h1>
  <div id="example"></div>
  <script></script>
</body>
</html>
Now that your HTML is configured. The below JavaScript will create the global configuration object that will populated with your widget configuration options. Copy and paste this into your script tags
    function createConfiguration() {
      if (window.frameElement.getWidgetConfig) {
        let config = window.frameElement.getWidgetConfig();
        window.widgetConfig = {};
        if (config) {
          for (key in config) {
            window.widgetConfig[key] =  config[key].toString();
            console.log(config);
          }
        }
      }
      return window.widgetConfig;
    }
You can then use these configuration options by calling the function that we created and utilizing the object. For now we are just going console log the configuration options. Copy the below function as well and paste it into your source tag.
    function useConfig() {
      const config = createConfiguration();
      const example = document.getElementById('example');
      example.innerText = config.textParam;
    }
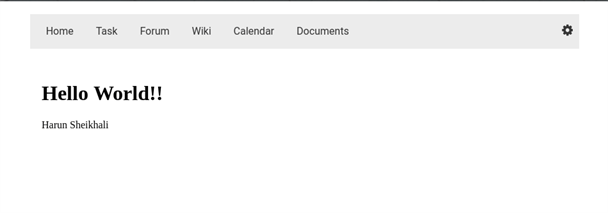
Now lets test it out! Lets put our name in the name text field and publish the widget.

It should display your name under the h1 tag. This confirms our configuration options work!

And there you go! You can now configure your widget with text fields that pass parameters to your JavaScript code. There are many more configuration types and options that you can use when making a widget. Now that you know the basics, check out the KB article on configuring your widget to explore the other options available to you