Inserting a table into the WYSIWYG Editor
Use the WYSIWYG Editor to insert tables into your content. Tables are a useful way of organizing tabular data into columns and rows.
How to insert a table into the WYSIWYG Editor
While you are creating content in the WYSIWYG Editor:
- Select a spot in the editor where you want to insert a table. If you select a location in the middle of a paragraph, the table will insert on a new line after the cursor's location.
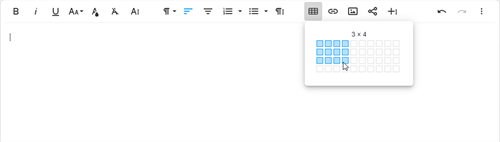
- Click Insert Table (
 ) and select the initial number of rows and columns that the table will have (up to 10x10). The table will insert after you select its size.
Editing tables in the WYSIWYG Editor
Table editing tools
Selecting a cell in a table while editing content in the WYSIWYG Editor displays a toolbar with the following editing tools:
Resizing columns
Drag the borders of a column to resize it. Dragging the furthest right and left borders reduces the size of the table.

Inserting additional rows and columns
With no cells in the table selected, hover over the intersection point of column and row borders on the left and top of the table to reveal an insert button. Click this button to insert a column (when at the top of the table), or a row (when at the left of the table) at this location. Alternatively, you can insert rows and columns using the Table Toolbar.


Adding a line break above or below a table
With no cells in the table selected, hover over the top or bottom of the table to reveal a break button. Click this button to add a line break. This option is only available when there is not already a line above or below the table.


Selecting multiple cells
Select a cell and then drag to expand the selection.
Alternatively, after selecting a cell, you can use the following keyboard shortcuts to expand the selection:
| Shortcut | Usage |
|---|
| Shift + Left / Right Arrow | Extend the current cell selection by one cell to the left or the right. |
| Shift + Up / Down Arrow | Extend the current cell selection by one cell up or down. |
 Table Header
 Remove Table
 Row
Row Column
 Table Style
 Cell
Cell Cell Background
 Vertical Align
 Horizontal Align
 Cell Style